Dashboard User and Access Management
In today's digital landscape, organizations rely on data visualization of various departments and groups to streamline their operations and manage data efficiently. One critical aspect of managing these data visualization effectively is ensuring proper user and access management. This is where the concept of a User and Access Management comes into play for a Data Visualization Tool.
Introduction
Dashboard User and Access Management feature allows you to control user access and permissions within your dashboard. By managing user accounts and assigning appropriate access levels, you can ensure that the right people have access to the right information. Dashboard user and access management is an important aspect of maintaining data security and controlling user permissions within a dashboard application. This how-to document will guide you through the process of managing users and access levels effectively.
How to Manage Dashboard Users and Access
Dashboard User and Access Management provides a centralized and structured approach to managing user accounts, permissions, and access levels across multiple dashboards and graphs. It allows administrators to define and control who can access specific features, functionalities, or data within a dashboard application..
The primary goal of the Dashboard User and Access Management system is to enhance security, maintain data privacy, and ensure that users have appropriate access rights on dashboards based on their roles and responsibilities. By implementing robust user management practices, organizations can mitigate the risk of unauthorized access, data breaches, and information leaks.
Assumption: Dashboard Builder 6.3 or higher version is already installed
Understanding User Roles
Before you start managing users and access levels, it's essential to understand the different user roles available within the dashboard builder. Common user roles include:
- - Admin: This role has full access to all features and settings, including user management.
- - Editor: Editors have the ability to create and edit content within the dashboard but may not have access to all administrative settings.
- - Viewer: Viewers can only view the dashboard content and reports, without the ability to make any changes.
Adding New Users
To add a new user to your dashboard application, follow these steps:
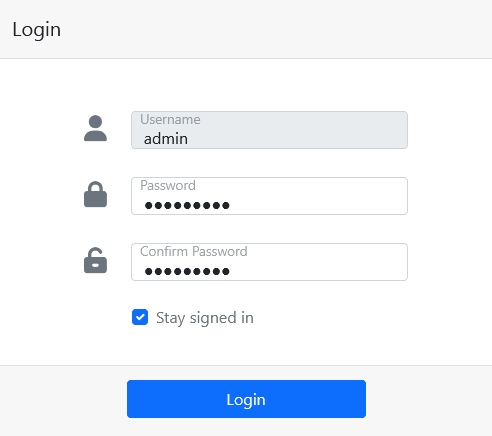
- Log in to your dashboard application using your admin credentials.
- Navigate to the "Settings" section, where user management is handled.
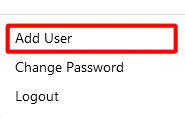
- Look for an option to "Add User" and click on it.
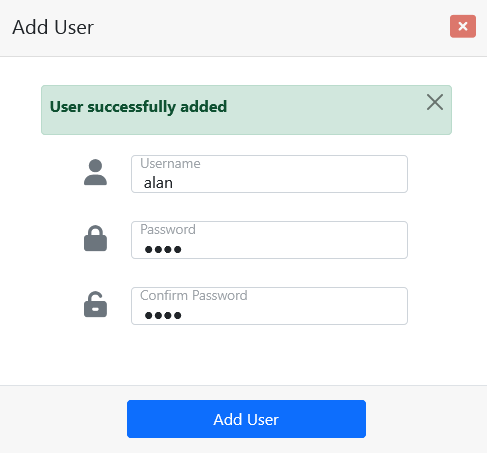
- Fill in the required information for the new user, such as user name.
- Set a temporary password for the new user and confirm it.
- Click the Add User button to save the user details

Allow the user to access the dashboard
To modify user permissions and access levels, follow these steps:
- Log in to your dashboard application.
- Open your dashboard that you want to share with other users
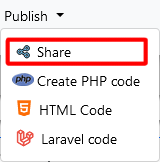
- Navigate to the "Publish" and click on the "Share" button
- If you want to share the dashboard with public then select "Anyone with the link can view" option
- If you want to share the dashboard with specific users then select "Restricted" option
- Find the user you want to share the dashboard with by clicking the drop-down list.
- Click on their name or select the appropriate option.
- Click on the Share button to share the dashboard with users.
- A share icon will be visible on your dashboard.
- The dashboard link will be visible, when the user opens the dashboard,


Removing a user's access from the dashboard
To remove a user from your dashboard, follow these steps:
- Log in to your dashboard application.
- Open your dashboard that you want to remove the access of users
- Navigate to the "Publish" and click on the "Share" button
- Select "Restricted" option
- Leave the drop down list blank
- Click on the Share button to save the changes.
- The user would have longer access to the dashboard..


Best Practices for User and Access Management
To ensure effective user and access management, consider implementing the following best practices:
- Regularly review user access and permissions to dashboards to align with changing requirements.
- Enforce strong password, including password complexity requirements.
- Document and communicate user management processes to ensure consistent practices across your organization.
- Train users on their respective roles, and acceptable use of the dashboards.
Conclusion
Managing user and access levels within a dashboard builder is crucial for maintaining data security and controlling user privileges. By following the steps outlined in this document and implementing best practices, you can effectively manage users and access permissions in your dashboard builder. Remember to regularly review and update user permissions as needed to ensure a secure and efficient dashboard environment.
How helpful was this information?
Related topics
- Dashboard User and Access Management
- Introduction
- How to Manage Dashboard Users and Access
- Understanding User Roles
- Adding New Users
- Allow the user to access the dashboard
- Removing a user's access from the dashboard
- Best Practices for User and Access Management
- Conclusion
- Video tutorial on How to Manage Dashboard Users and Access
- How helpful was this information?